Tuesday, November 23, 2010
Cardstock Organization
These are the new Jetmax cubes for organizing your scrapbook paper. They are designed to house your 12" x 12" cardstock or patterned papers in 12" x 12" hanging file folders. The 12" x 12" hanging file folders are quite expensive (6 for approx. $10 if I remember correctly). Each cube comes with 6 of them which will get you started. I decided that I really needed a permanent home for my 8 1/2" x 11" Stampin' Up! cardstock, but 11" wide hanging folders are too small. I asked my husband to drill 4 new holes in the sides and make the bars slightly lower to fit my colour tabs. If you use these cubes for 12" x 12", the tabs do not fit as those hanging folders fit just perfectly snug in the cubes. I highly recommend these cubes.
Wednesday, August 4, 2010
Ideas
Wow it has been a while since my last post! As soon as the nice weather hits you'll find me in my garden. I feel like my scrapbook room has been neglected, so I'll start with a fresh post!
In this cube, along with my clear mount stamp and embellishment binders, I have my idea binder. Which is grouped into sections.
In the front I have all my general layout ideas that I got from places like 'Page Maps'. The next tab is ideas about things I'd like to Scrapbook. I'll write things like "Trip to Jamaica" and maybe sketch out something I want to see in my layout or techniques or products I'd like to use. In the next section I'll stuff in ads of products I like or things they do. Next I'll write out steps for techniques. Then the next section is where I post other peoples layouts that I like for inspiration.
The last section is for card ideas. When I make a card I always seem to start with a stamp set in mind then go from there. This section is laid out by stamp set name, this way when I'm stuck for an idea for a card I can go to that exact set and get inspiration.
Labels:
Ideas
Sunday, March 21, 2010
Punches
I did have my punches in a drawer in one of the cubes, but it wasn't working for me. They were taking up valuable real estate, so I went searching for a better idea. I've seen many websites where people use these Kitchen Rails from Ikea. I didn't want them mounted on the wall as I'm not big on having a cluttered space even if it looks organized. I always think about resale value of my home and if we decide to sell and the people looking at the house aren't scrapbookers, then they just see the holes in the walls they are going to have to repair. Or the holes we'd have to repair before putting it up for sale. I like it being on the door as when it's closed it's pretty and when it's open it's functional. I bought the matching longer basket to hold the new EK Slimline Punches too. I prefer these bigger punches and I will be buying more of them before SU! switches to the slimline version, so I foresee getting more of these rails very soon.
Sunday, March 14, 2010
General Update
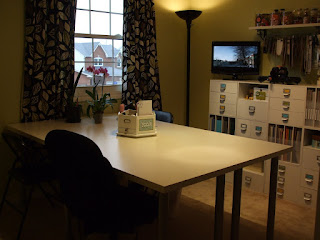
I just started having classes in my Scrapbook Room, so I had to rearrange the furniture to accomodate 4 people (or just me as my stuff just seems to spread as I get into a project. I've also started an orchid collection. They need lots of sunlight and seem to like it at the end of the table.
Monday, March 1, 2010
Great Organization Blog
After searching some ideas on Google I found this great blog. you have to check it out!
http://craftystorage.blogspot.com/
http://craftystorage.blogspot.com/
Saturday, February 20, 2010
Die Cutting Supplies
The first die cutting machine I got was a digital one, so I don't have a large collection of dies. Before becoming a SU! demo, I only had Quickutz dies and Cuttlebug Embossing Folders. Now I have Sizziz, sizzlets, Originals and Bigz dies so more storage method for these will evolve. For now here is how I store my dies.
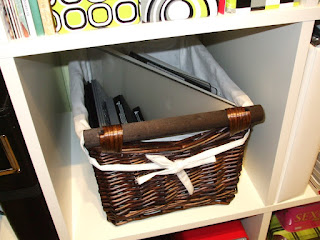
I keep all my platforms, cutting pads, Texturz Plates and large dies in this basket on my Expedit book case. I'm sure I'll have to change this method as my collection grows.
I use this Quickutz All-in-one Binder to store all my thin dies and embossing folders. This binder then goes on the Expedit book case.
I couldn't find anything to fit my embossing folders that fit in this binder so I took regular sheet protectors you would get at an office supply store, cut then to size from the top opening, then used a melting tool to create a seam.
For the smaller embossing folders, sizzlit dies, and embosslit dies, I cut reguular baseball card holders to size.


I bought the Quickutz magnetic sheets for this binder to hold my cookie cutter and other thin metal dies. I like how easily it is to see which ones I have.
These 2x2 alphabet dies came with the holder, but you can purchase more.
They also have 4x8 die holder sheets. They have 4x4 ones too, but since I only have 2 dies that size, I've just been using these 4x8 ones for now.
And finally they have ones for your border dies. Each border die holder has 3 slots, 1 for wide border dies and 2 for the regular ones. My only beef is that all my dies are wide so my top slots are empty.
Monday, February 8, 2010
Non-Visible Embellishment Storage
I have 4 containers like the one above. 2 are from Dollarama and the others are from Wal-mart. I would have continued buying the one from Dollarama, but they stopped making them. I try to organize by colour, size and finish (metallic, sparkly, etc) I like these containers as they store nicely in the smaller drawers in the cubes and travel well also. I like that each colour can be in it's own container. I did have my brads and eyelets in a container that stacked (see below), but these did not travel or store well. They fell apart really easily in my rolling tote and I'd spend the first 20 mins of a crop picking up tiny eyelets and brads.
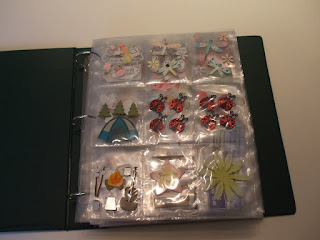
When I first started scrapbooking I used a lot of stickers. I would take these out of the packages and store in a binder. I used baseball card sleeves to seperate the small ones and regular sheet protectors for the big ones. This binder then sits with my stamp binder and stencil binder.
I store all my letters and numbers in a drawer by itself. I don't have a lot of these so I find this method works for me.
I store my buttons by colour in a fishing tackle container. I'm not a fan of looking at plastic containers so I store any of these in a cube along the wall or in the closet.
Monday, February 1, 2010
Tools
Now I have to admit, I do have my tools scattered over my room and with good reason. I keep the tools I travel with in my AMM Tote-ally Cool Tote 2. They are easy to get at and easy to travel with. It comes with a swivel base which is a nice feature. I just pull it down when I'm scrapbooking and put it back on the shelf when I'm not. I love having a clean table when I'm not working. And yes my room looks like it does in the General View Post whenever I'm not working. I have a tad bit of OCD :)
I have the Jetmax version of the carousel on my desk all the time. It has my scissors, adhesive, pens, pencils, tag maker, etc in it. These items stay in my room even when I'm travelling.
Then for the bulkier items like my Circle Scissors Plus, Powder Pals trays, Embossing Gun, etc. I keep them in the drawers of the cubes.
For my extra adhesives, staples, sponges, etc. they go in the drawer with the seperators in them.
Friday, January 22, 2010
Visible Embellishment Storage
When I talk about embellishments I'm talking about buttons, stickers, rub-ons, pre-cut die shapes, tags, flowers, rhinestones, etc. I store these items in 2 major different ways; visable and non-visable. I store all my flowers in the containers they were bought in on the top shelf, then underneath I have an in-expensive curtain rod I got from IKEA. It is customizable to the exact length you want. Remember when purchasing a hanging system like a curtain rod and hooks not to buy one that involves taking off the rod evrey time you want to add a new embellishment to it. You want to get one that has hooks instead of rings. I store any embellishments that come in a flat package, in their original packaging, hanging from this wire rod. Some people like the deskop "Clip-it-up" version from Simply Renee, but I prefer mine up and off the table. I group them mostly by manufacturer so that when I pull out a paper divider (as shown in my Patterned Paper post) I can easily get the matching embellishments to go with it. Sometimes I buy kits with PP and the matching embellishmens and it will come with stickers or die cuts that are on a 12" x 12" sheet. These sheets get stored with the PP as they do no fit depth wise from the hanging wire rod.
Tuesday, January 19, 2010
Ink Pad Storage
I've had multiple people ask me where I got my Ink Pad Storage Unit from. It is a custom made unit, but here are some ideas for store bought items.
1. Check out http://www.organizemore.com/ I beleive they are located in Tennessee, but I think they ship anywhere in North America.
2. If you have an old cassette organizer, it will fit SU! or similar sized pads.
3. I highly recommend SU! table top organizer if you do not have wall space.
4. There are people on ebay selling handmade units they've built in their garages/shops. Have a look under Rubber Stamping or Scrapbooking then Organization.
5. You can have a look at this website for ideas, but I think the shipping might be astronomical since they are in the UK http://www.inkylicious.co.uk/
Hope that helps!
Friday, January 15, 2010
Stamps
I store my SU! wood mount stamps in my closet on the middle shelf for easy access. I love my stamps, but I don't find them to be that attractive of a home decor piece and since I do have a bit of training in Interior Decorating, I'm always thinking about design whether it be on my scrapbook page or in my home. I store my acrylic stamps in a binder for easy access and quick review.
Every time I get a new wood mount stamp set, I copy the label sheet and place in my stamp binder so that I don't have to pull out the SU!containers to see what I have. If I buy a single wood mount stamp I stamp the image and label it on a blank sheet and put in the binder.
When I buy some of the smaller discount acrylic stamps I put them in baseball card holders in the stamp binder.
For all my other cling mount/acrylic stamps I bought overhead projector sheets for the office supply store, cleaned them with isopropyl alcohol to remove the anti-static agent and put them in my stamp binder. I put a sheet of white paper between each sheet of stamps to help me see them better.
Wednesday, January 13, 2010
Ink and Other Medium
I searched for over a year for a wall mounted storage unit that would hold my ink and other medium, but I couldn't find anything. Then my good friend offered to build me a custom unit to suit my needs. All I had to do was come up with the design.
The rest of my colouring medium is in this drawer since they don't fit on the custom unit. I use dollar store mini baskets to keep little items from shifting around in the drawer.
You should store your markers laying down to keep them from drying out. I got this CTMH marker tower for Christmas.
Friday, January 8, 2010
Cardstock
I organize my Stampin' Up! cardstock and my scrapbooking cardstock (12" x 12") differently as I use them differently. I use my SU! cardstock by name and colour so I find having it organized in file hangers with tabs help me see exactly what I need. I can also easily take the entire container with me when I'm cropping at a friends house or just pull out the hangers I want and place them in a smaller hanging container. The container and the hangers I purchased at Wal-mart and the tab inserts I bought on ebay along with a ring of cardstock swatches. Some people organize their SU! cardstock by colour family (ex. Bold Brights or Earth Elements), but I like all of mine sorted by colour as I don't tend to think by colour family.
My 12" x 12" scrapbook carstock is in my Cropper Hopper Paper Holders categorized by type of paper. There is one holder for regular cardstock, another one for core-dinations or other different "core" cardstock, one for handmade cardstock and the last one is for my 12" x 12" textured SU! cardstock. I also have some lower quality 8 1/2" x 11" cardstock in there to easily fit my Silhouette machine, but I harldy use it since being introduced to SU! The quality of the carstock makes a big difference when making a card since it will be fondled quite a bit compared to a scrapbook page in a protective sheet. I really like the Cropper Hopper Holders as they are easy to pull out of my Jetmax cubes and thumb through what I need. I try to organize by colour as well.
Monday, January 4, 2010
Patterned Paper
When organizing anything in your room you need to think about how you use that product. Do you think by colour, theme, or pattern? When I use my patterned paper I think by manufacturer. This system seems to work for me as I can grab multiple sheets of PP and know that they will work well together. However you go about orgainzing your PP, these Cropper Hopper Value Pack organizers work great! I spend 75% of my scrapbooking time outside of the house. With my PP in packets it's easy for me to grab the PP I want and pack my bag quickly. I originally had my PP and cardstock stacked horizontally. I found this didn't work for me as I was constantly pulling out the entire pile to get at what I wanted and then I had to tidy up the pile to put it back. That was just too much work for me. With the dividers I can quickly thumb through and get what I need.
Sunday, January 3, 2010
Ribbon
This is how I store my ribbon than comes on spools large enough to fit in the storage container. I organize my ribbon by colour because that's how I use ribbon. You can buy these containers at Michael's. I chose this method over other ones as I like the way the container dispenses the ribbon and the way it displays it. It's very easy to pull out the exact amount you want then snip. No need to put anything away but the scissors.
For m ribbon that comes in tiny spools or wrapped over flat cardboard I store this way. I purchased these flat spools, made by Cropper Hopper, at a local scrapbook store. I take the ribbon off it's original packaging then wind it around the spool. Since most of these ribbons came with matching partners, they are stored with the ribbon they came with. So for the most part they are arranged by company.
Lighting
Lighting is very important in paper crafting. You want to be able to see the true colours of the items you are working with. I have a torch lamp for all over light and a track fixture for spot lighting. I also try and keep my curtains open as much as I can as nothing is better than natural lighting.
General View
This is a general view of my scrapbook space. I was immediately drawn to the colour of the walls when I saw it in "The Organized and Inspired Scrapbooker". The name of the paint is "Celery Sprig" from Behr. Even my laptop is a very similar colour. The curtains are from Ikea along with the desks and Expedit bookshelf. The cubes are from Michael's. You will see that these cubes and the bookshelf are used a lot by scrapbookers and with very good reason. The hold a lot of supplies and are aesthetically pleasing. I'm really not a fan of the plastic storage tote look, although I do have one under my desk for my current projects. You will notice with these general shots and with future posts that I use many methods of storage that are all dependant and what I am storing. I like using ribbon and flowers so they are out wheere I can see them. Where as my stamps are hidden away.
Copyrighted Scrapbook Room Organization 2009. All rights reserved. Powered by Blogger
Blogger Templates created by Deluxe Templates. Wordpress designed by Simplywp


